Burp Extension is a Java-based Web Penetration Testing framework. It has become an industry-standard suite of tools used by information security professionals.
It helps you identify vulnerabilities and verify attack vectors that are affecting web applications.
It is a collection of tools bundled into a single suite made for Web Application Security or Penetration testing. It’s a java executable and hence it’s cross-platform.
It is an integrated platform for performing security testing of web applications. Its various tools work seamlessly together to support the entire testing process, from initial mapping and analysis of an application’s attack surface, through to finding and exploiting security vulnerabilities.
Extensions can be written in Java, Python, or Ruby.
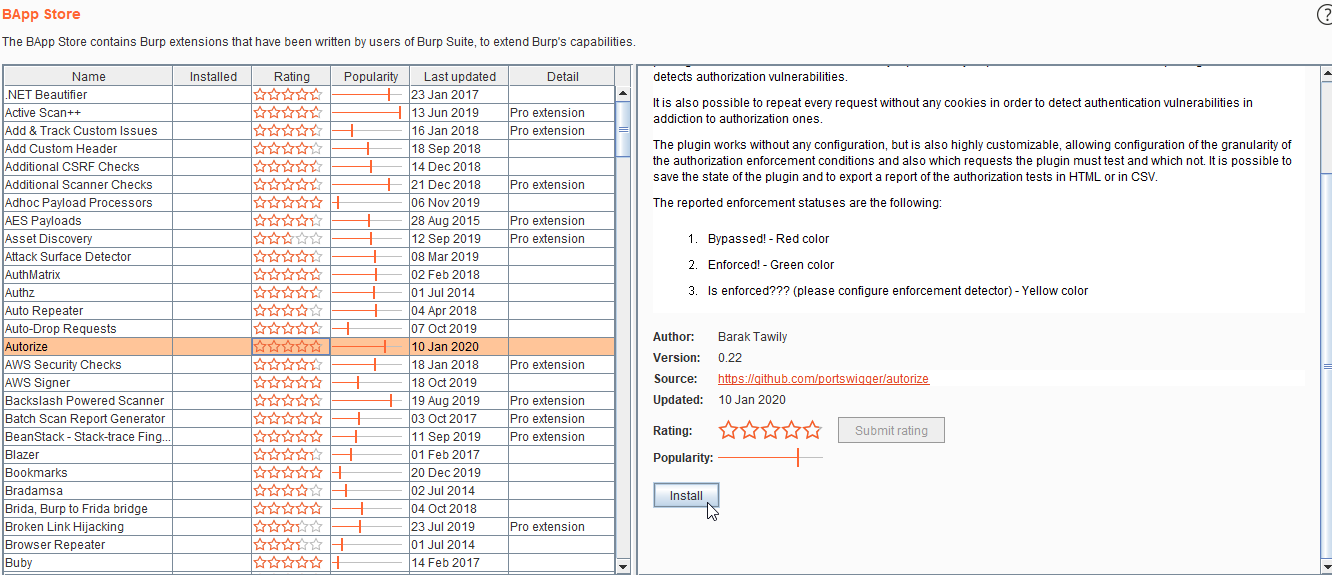
The reported enforcement statuses are the following:
1. Go to the extension tab and select Authorize and click on the install button.
2. We have 2 users: user 1: admin and user 2: normal user. Intercept the user 2 requests and copy the whole cookie. Go to Authorize tab and paste the user 2 cookies as shown in the figure and turn on the authorize.
3. Now login into user 1 i.e. admin. Browse the website, try each and every functionality which has Admin Privileges, and can’t be accessed by a normal user.
4. As you can you see a number of requests arrived. If you get 403 Forbidden error on the Modified request then there is No Vulnerability. Look for a request which is not enforced. Select the request and observe the original request.
5. Observe the Original response.
6. Observe the modified request, user 1 cookie is replaced by user 2 cookie.
7. Observe the modified response and the website is vulnerable to Privilege Escalation.
Source: https://github.com/portswigger/co2
1. Navigate to the Burp extension tab and select CO2 and click on the install button.
2. Configure the Co2 Extension, add the path of sqlmap and python.
3. Navigate to DVWA (dummy website) and add a ‘(quote) in the search field.
4. Intercept the request.
5. Right-click on the request and select SQLMapper.
6. Navigate to CO2 and run.
7. The result can be seen in terminal and data is dumped.
Source: https://github.com/portswigger/csp-bypass
1. Navigate to the Burp extension tab and select CSP-Bypass and click on the install button.
2. It passively scans for CSP headers that contain known bypasses, as you see in the below figure.
Source: https://github.com/portswigger/csrf-scanner
1. Navigate to the Burp extension tab and select the CSRF Scanner and click on the install button.
2. Add tokens match if you want to!
3. Perform some action.
4. Burp as find CSRF vulnerability as the token is missing in the request.
Source: https://github.com/portswigger/error-message-checks
1. Navigate to the Burp extension tab and select Error Message Checks and click on the install button.
2. After surfing the particular website, Navigate to the Target tab and you detailed error message as shown below figure.
Source: https://github.com/portswigger/flow
1. Navigate to the Burp extension tab and select Error Message Checks and click on the install button
2. Navigate to the flow and configure as required.
Source: https://github.com/portswigger/http-request-smuggler
1. Navigate to the Burp extension tab and select Error Message Checks and click on the install button.
2. Navigate to the application and intercept the request. Right-click on the request and click on the Launch Smuggle probe.
3. After some time, you can see vulnerability in the issue tab as shown in the below screenshot. Observe Request 2.
4. Observe the Response, we got the status 200 OK.
5. Observe Request 3 as shown in the below screenshot.
6. Observe Response 3, as shown in the below screenshot. We got some unusual responses from the server. It is vulnerable to HTTP smuggling attack.
7. We can confirm this vulnerability by right-clicking on the vulnerable request. Select appropriate Smuggle attack, in our case it is CL TE smuggle attack.
8. Click on the attack button.
9. Observe the screenshot, We got an unusual response from the server. Hence the application is vulnerable to the HTTP smuggling attack.
Source: https://github.com/portswigger/xss-validator
1. Navigate to the Burp extension tab and select XSS Validator and click on the install button.
2. Navigate to DVWA application and search.
3. Intercept the request and send it to the intruder.
4. Select the value in which you want to add a script.
5. In Payload Sets, select Payload type as extension generated and in Payload Options, select the selected generator as extension i.e. XSS Validator.
6. Copy the grep phrase from XSS Validator and add it in Grep-Match.
7. Start the attack. The tick once is the attack performed successfully.
8. View response in the browser. Attack performed successfully!!.
Source: https://github.com/portswigger/notes
1. Navigate to the Burp extension tab and select Notes and click on the install button.
2. Add a new note and save it.
Source: https://github.com/portswigger/retire-js
1. Navigate to the Burp extension tab and select Retire.js and click on the install button.
2. Vulnerable version is disclosed by Retire.js extension
This post was last modified on February 20, 2024 11:30
File inclusion refers to including external files within a web application. These files can be… Read More
The Open Systems Interconnection (OSI) model is a conceptual framework for understanding and standardizing how… Read More
What is Gray Box Pen Testing? Gray box penetration testing is an application security testing… Read More


