What is Rooting?
Rooting is the process of gaining administrative privileges, often referred to as “root access” or “superuser access,” on an Android device.
It involves unlocking the operating system’s full potential and obtaining control over the device’s core functionalities that are typically restricted to regular users.
Security researchers or pen testers require root access to conduct thorough evaluations of application security. This access is crucial for bypassing certificate pinning, necessary for intercepting HTTP communication between the app and a remote server. Root access is also vital for examining and evaluating data storage and secrets handling practices.
On the other hand, malicious hackers exploit root access to manipulate target application logic or to amplify the impact of malware campaigns.
Why do We Need Android Root Detection?
Root detection involves identifying whether an Android device has undergone rooting, enabling users to execute commands with elevated privileges beyond those normally available.
While rooting grants users’ greater control over their devices, it also poses several risks:
Security Vulnerabilities: Rooted devices are more susceptible to malware, as malicious apps can exploit root privileges to access sensitive data or modify system files.
Voided Warranty: Rooting typically voids the device warranty, leaving users ineligible for manufacturer support or repairs.
Instability and Performance Issues: Improperly executed rooting procedures can lead to device instability, frequent crashes, or reduced performance.
Bricking the Device: Incorrectly rooting the device or flashing custom ROMs can render it unusable (bricked), requiring technical expertise to restore functionality.
Implementing root detection helps mitigate these risks by providing insights into the device’s security status and enabling applications to enforce necessary security measures to protect sensitive data and maintain system integrity.
Common Root Detection Methods
Various basic techniques exist to determine whether an Android device has been rooted programmatically:
Check for Known Root Files/Paths
Rooted devices often have certain files or directories present on the system that are not present on non-rooted devices. These can include files like Superuser.apk or directories like /system/xbin/su. By checking for the existence of these files or directories, you can infer whether the device is rooted.
Check for SU Binary
The SU binary (superuser binary) is a common indicator of a rooted device. This binary allows users to execute commands as the root user, providing elevated privileges. By attempting to execute a shell command to check for the presence of the SU binary, you can determine if the device is rooted.
Check for System Properties
Rooted devices might alter certain system properties, such as ro.build.tags, ro.build.type, or ro.debuggable. These properties can provide clues about the device’s root status. For example, the presence of “test-keys” or “eng” in these properties may indicate that the device is rooted.
Check for BusyBox
BusyBox is a common tool installed on rooted devices. It provides a set of Unix utilities in a single executable file. By checking if BusyBox is installed on the device, you can infer that the device may be rooted.
Check for Root Management Apps
Rooted devices often have apps installed for managing root access, such as SuperSU or Magisk Manager. You can check for the presence of these apps on the device to infer whether it’s rooted. However, keep in mind that some users might have rooted their devices without installing such apps.
Verify System Integrity
Check the integrity of system files and partitions. Rooting often involves modifying system files or partitions. You can compare the checksums or signatures of critical system files against known values to detect any modifications.
Inspect Device Build Properties
Besides the specific properties mentioned earlier, you can examine other build properties such as ro.secure and ro.allow.mock.location. Deviations from typical values or unexpected combinations of properties might indicate a rooted device.
Attempt to Write to Protected Locations
Try to write to protected locations such as /system or /data directories. On non-rooted devices, such attempts will likely fail due to restricted permissions. However, on rooted devices, these operations might succeed.
Check out the set of 154 test cases for comprehensive penetration testing of Android applications and verify that they don’t have any security loopholes.
Understanding Android Root Detection Bypass
Root detection bypass refers to the process of bypassing security measures put in place to detect rooted or compromised devices.
When an application or system employs root detection mechanisms to defend against unauthorized access or tampering, attackers may attempt to bypass these measures to gain unrestricted access to the device or application.
This bypass can take various forms, including the use of sophisticated tools and techniques designed to conceal root access or manipulate detection mechanisms.
Some common methods of root detection bypass include:
Root hiding techniques: Attackers may employ tools like Magisk Hide or Xposed Framework to conceal root access from detection mechanisms used by applications or systems.
Code injection and modification: Attackers may inject malicious code into the application’s runtime environment to manipulate or disable root detection checks.
Emulation and virtualization: By running the application in an emulated or virtualized environment, attackers can evade root detection checks that rely on device-specific characteristics.
Customized firmware and ROMs: Attackers may install custom firmware or ROMs that modify system behavior to bypass root detection mechanisms.
Runtime manipulation: Techniques like hooking and controls with tools like Frida can be used to intercept and modify runtime behavior, including root detection checks, to evade detection.
To mitigate this risk, developers and security professionals must continuously update and enhance root detection mechanisms to stay ahead of evolving bypass techniques.
Additionally, implementing layered security measures and adopting best practices for secure coding can help strengthen overall security posture and reduce the likelihood of successful root detection bypass attacks.
Recommended Root Detection Implementation Flow
The goal of comprehensive Android root detection is to make running the application on a rooted device more difficult. Detecting rooted devices alone is not sufficient, but implementing various checks throughout the app can improve the effectiveness of overall implementation and improve the security of Android apps.
In the following section, we outline common Android root detection bypass mitigation methods and provide reference steps for implementing them.
We highly recommend incorporating all these checks into your application. If any of these checks fail, ranging from Step 1 to Step 5, it’s advisable not to allow the end-user to proceed further.
- Implement Emulator Detection
- Implement Google SafetyNet Attestation API – ctsProfile and basicIntegrity
- Implement Multiple Root Detection Checks
- Implement Frida Detection
- Implement Magisk Detection
- Source Code Obfuscation
1. Implement Emulator Detection
Many security researchers and penetration testers use virtual devices to test the security of Android applications. Having emulator detection gives one layer of additional protection to your application against runtime manipulation.
Reference Implementation:
Utilize resources like the Android Anti-Emulator GitHub repository. This repository offers various techniques for detecting emulated Android environments and determining whether your application is running on a virtual device.
Presentation Slide Link: Anti-emulator-slides
Source Code Link: Anti-emulator
2. Google SafetyNet Attestation API – ctsProfile and basicIntegrity
The Google SafetyNet Attestation API serves as an anti-abuse mechanism, allowing app developers to verify whether a user’s Android device meets specific requirements and to authenticate the interaction between application servers and genuine apps. This API is essential for abuse detection purposes.
The SafetyNet Attestation API creates device profiles based on software and hardware information, comparing them to a list of whitelisted device models that have passed Android compatibility testing.
When this API is called, SafetyNet will download a package containing device validation code which is provided by Google. Then, the code is dynamically executed on the device to check the integrity of the device.
basicIntegrity Check:
Purpose: Assess the general integrity of the device and its API.
Result Interpretation: Many rooted devices, emulators, and devices with signs of tampering (such as API hooks) fail the basicIntegrity check.
ctsProfileMatch:
Purpose: Verify if the device profile matches one of Google’s approved devices.
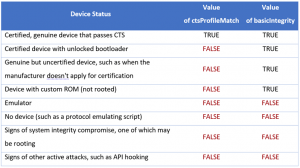
Result Interpretation: Unmodified devices certified by Google can pass the ctsProfileMatch check. The following types of devices will generally fail ctsProfileMatch check:
- Devices that fail basicIntegrity
- Devices with an unlocked bootloader
- Devices with a custom system image (custom ROM)
- Devices for which the manufacturer did not apply for, or pass, Google certification
- Devices with a system image built directly from the AOSP (Android Open Source Program) source files
- Devices with an operating system image, which was distributed as part of a beta or developer preview program (including the Android Beta Program)
To use the API, an app can call the SafetyNetApi.attest method, which returns a JWS message with a result. The application can then check various fields from the returned result:
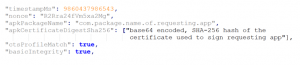
A sample attestation result:
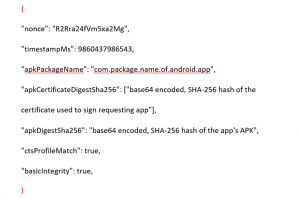
Nonces: Used to match the response to its request.
TimestampMs: Indicates the time elapsed since the request was made and the response was received, detecting suspicious delays.
ApkPackageName, ApkCertificateDigestSha256, ApkDigestSha256: Provide information about the APK file to verify the app’s identity. These parameters are absent if the API cannot determine APK information.
basicIntegrity
True: The device likely hasn’t been tampered with.
False: The device integrity is compromised, possibly due to rooting or other tampering.
ctsProfileMatch
True: The device profile matches an approved Google device.
False: The device profile does not match an approved Google device, indicating potential tampering or non-compliance.
Potential Integrity Verdicts:
The following table explains how device status affects the values of basicIntegrity and ctsProfileMatch:
By leveraging these integrity checks, developers can enhance the security of their apps and protect against potential threats arising from compromised or tampered devices and root detection bypasses.
How to Implement Google SafetyNet Attestation API
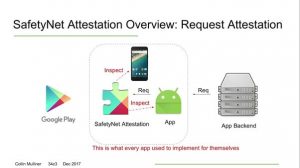
The API checks the device’s integrity and provides a cryptographically signed attestation. To create “attestation”, API will examine the device’s software and hardware environment. Besides, it will perform a check for integrity issues, and compare it with reference data of approved Android devices. The attestation also contains a timestamp.
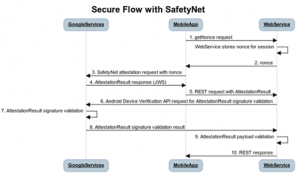
SafetyNet Attestation API Workflow:
- The Android app sends a call to the API, including a nonce.
- The API assesses the device’s runtime environment and requests a signed attestation of the assessment results from Google’s servers.
- Google’s servers send the signed attestation to the SafetyNet Attestation service on the device.
- The Attestation service returns the signed attestation to the Android application.
- The mobile app forwards the signed attestation to its server.
- The server validates the response and utilizes it for anti-abuse decisions.
Code Snippets
Making a SafetyNet attestation request (Java code):
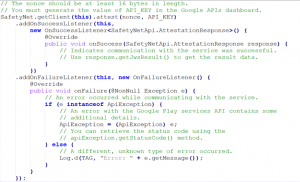
SafetyNet attestation response on your server:
Refer the document: SafetyNet Attestation
Reference Implementation
The reference implementation includes the following details:
- Sample Android App: Android application written in Java that uses Google Play Services for the SafetyNet API on a device.
- Server-side Java code: Two examples showing how to verify a SafetyNet API response on a server written in Java, including offline and online using the Android Device Verification API.
- Server-side code C# code: Two samples showing how to verify a SafetyNet API response on a server written in C#, including offline and online via using Android Device Verification API.
Reference for Implementation: Android Play Safetynet
Key Elements of SafetyNet
Supplementary Security Measure: SafetyNet should not be relied upon as the sole security mechanism for your app. It’s best used alongside other mobile application security measures.
Internet Dependency: The API requires an active internet connection to function. It won’t work when the device is offline. In such cases, the API returns an error if the device lacks internet access.
Avoid Direct Response Interpretation: Responses from the SafetyNet API should not be directly interpreted within the app itself. Instead, it’s advisable to shift all anti-abuse decision logic to a server controlled by the application team. This approach helps prevent potential abuse or exploitation of the API’s responses.
Boolean System Integrity Values: The API provides Boolean values that indicate different levels of system integrity. These values offer insights into the device’s security status, aiding in making informed decisions regarding app functionality or access.
No DRM Replacement: SafetyNet does not implement or replace Digital Rights Management (DRM) checks. It focuses solely on assessing device integrity and does not address DRM-related concerns or protections.
3. Implement Layered Root Detection Checks
Detecting root access on Android devices is tough due to modern bypass tools such as RootCloak, RootCloak Plus, “system-less” root, Magisk Hide, and Frida root bypass scripts.
As no single check can detect all rooting methods, implementing multiple layers of checks strengthens detection capabilities, thereby minimizing the risk of root detection bypass.
Below are few Android root detection checks:
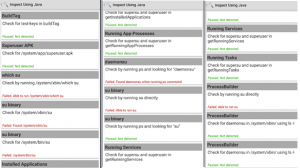
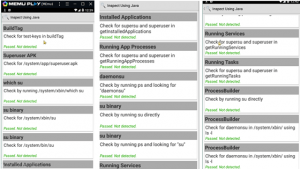
Root Inspector
Most detection apps simply try to run su or perform basic checks. Root Inspector utilizes multiple root detection methods, offering 15 checks via SDK (Java) and 13 checks via NDK (Native Code). This comprehensive approach enhances effectiveness against tools like RootCloak or RootCloak Plus.
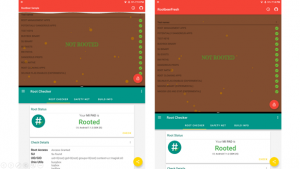
Root Detection Results using Root Inspector
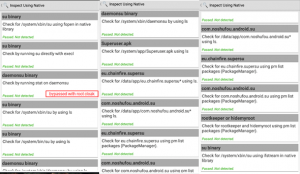
To assess Root Inspector’s effectiveness, we tested an unmodified app version on both a rooted virtual device and a rooted physical device. Various root detection bypass techniques were implemented to simulate real-life scenarios, and the results were analyzed.

Results achieved on a virtual device after implementing common bypass techniques.
Result 1
Memu Emulator (Running Android 7), Xposed Framework, RootCloak (with native root detection bypass enabled) were used during this test.
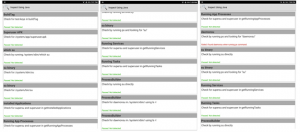
Result 2:
Memu Emulator (Running Android 7), Xposed Framework, Frida Objection, Frida root bypass script and RootCloak were used during this test.

Results achieved on a physical device after implementing common detection bypasses.
Result 1:
Xiaomi Mi Pad 1 (Running Lineage OS 14 with Android 7.1.2 ), Magisk Core, Magisk Hide (with Magisk Hide enabled on Root Inspector), and Frida root detection bypass scripts were used during testing.
Source Code: RootInspector
Reference for Implementation:RootInspector
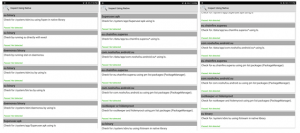
RootBeer Sample and RootBeer Fresh
RootBeer library is an open-source project that checks if the Android device is rooted or not. RootBeer Fresh is based on the original RootBeer project but implements some new and different techniques to detect rooted devices including basic checks to detect Magisk.
Results achieved on a virtual device after implementing common root detection bypass
Result 1:
Memu Emulator (Running Android 7), Xposed Framework, RootCloak, and Frida Objection were used during this test.
Results achieved on a physical device after implementing common detection bypasses.
Result 1:
Xiaomi Mi Pad 1 (Running Lineage OS 14 with Android 7.1.2 ), Magisk Core, Magisk Hide (with Magisk Hide enabled on RootBeer Sample and RootBeer Fresh) were used during testing.
By incorporating these root detection mechanisms into your app, you can enhance its security and protect against potential threats posed by rooted devices.
RootBeer Fresh:
- Source Code: RootBeer Fresh
- Reference for Implementation: RootBeer Fresh
RootBeer:
- Source Code: RootBeer
- Implementation: RootBeer
4. Implement Frida Detection
Frida is a popular dynamic instrumentation toolkit commonly used by mobile application penetration testers for various purposes, including root detection bypass and SSL pinning bypass.
To maintain the security of your application, it’s essential to implement Frida hooking detection to prevent Frida from intercepting and manipulating your app’s behavior.
One approach to implement Frida detection is by utilizing tools like DetectFrida, a GitHub project that employs three methods to detect Frida hooking:
- Detection through Named Pipes used by Frida
Frida uses named pipes for communication between the Frida server running on the device and the Frida script executing on the host machine. DetectFrida monitors the presence of these named pipes, and if detected, it indicates the potential presence of Frida hooking.
- Detection through Frida Specific Named Thread
Frida creates specific threads with unique names during its hooking process. DetectFrida checks for the existence of these threads within the application’s process. If such threads are found, it suggests that Frida may be actively hooking into the application.
- Comparison of Text Section in Memory with Text Section in Disk
DetectFrida performs a comparison between the text section of the application’s memory and the text section of the application’s disk image. Frida injects its code into the application’s memory, altering the text section. By comparing these sections, DetectFrida can identify discrepancies, indicating potential Frida hooking.
By incorporating Frida detection mechanisms like those employed by DetectFrida into your application, you can enhance its resilience against Frida-based attacks, ensuring the integrity and security of your app’s execution environment.
AntiFrida
AntiFrida, available on GitHub, is a repository designed to identify Frida instrumentation within a process. It accomplishes this by conducting a comprehensive scan of all local TCP ports. For each port, AntiFrida sends a D-Bus message to determine the presence of frida-server. Additionally, it examines text sections to search for specific strings typically found within files like frida-gadget*.so or frida-agent*.so.
5. Implement Magisk Detection
When a device is rooted using the “systemless root” method, modifications are stored in the boot partition, making it challenging to detect root access through basic checks. Magisk is a popular tool for rooting Android devices in a “systemless” manner, offering features like Magisk Manager for configuring modules and other functionalities.
However, Magisk Manager can be hidden by changing its package name, and Magisk Hide prevents applications from detecting root presence. Therefore, implementing Magisk detection is crucial to prevent your Android app from running on rooted devices.
MagiskDetector:
Magisk Detector is a tool that performs multiple checks to detect the presence of Magisk, including verifying if Magisk Hide is enabled. This comprehensive approach ensures effective detection of Magisk and its associated features.
Source Code: MagiskDetector GitHub Repository
Reference Implementation: MagiskDetector Releases
DetectMagiskHide:
DetectMagiskHide is another GitHub repository aimed at detecting Magisk presence and determining whether Magisk Hide is enabled on the device. Although similar in purpose to MagiskDetector, DetectMagiskHide may offer slightly different detection methods or features.
Source Code: DetectMagiskHide GitHub Repository
6. Implementing Source Code Obfuscation
Application reverse engineering is a common technique used by application penetration testers to understand the technical details of an application. Analyzing the application’s source code allows them to gain insights into its functioning.
Source code obfuscation is required to enhance the security of the application by making it more difficult for attackers to reverse engineer and understand the underlying logic, thereby protecting intellectual property and sensitive information contained within the codebase.
IBM ProGuard:
One effective tool for source code obfuscation in Android applications is IBM ProGuard. ProGuard offers features to obfuscate, shrink, and optimize your codebase. Here’s how it works:
Renaming: ProGuard renames classes, fields, and methods with obscure names, making it harder for attackers to understand the code’s logic.
Unused Code Removal: In addition to obfuscation, ProGuard removes unused code segments from your application, further reducing the footprint and complexity of the codebase.
Optimizations: ProGuard performs various optimizations to improve the performance of your application, ensuring that it runs efficiently on the target device.
By employing ProGuard, you not only enhance the security of your application by obfuscating its source code but also reduce the APK file size, leading to faster download and installation times for users.
For example,

Code Snippet and Documentation
To shrink, obfuscate, and optimize the Android application, implement the following code in project-level build.gradle file.
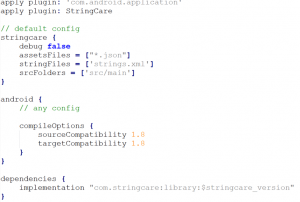
minifyEnabled: Enables code shrinking, obfuscation, and optimization for only your project’s release build type.
shrinkResources: Enables shrinking of resources, performed by the Android Gradle plugin.
proguardFiles getDefaultProguardFile: Includes the default ProGuard rules files that are packaged with the Android Gradle plugin.
Documentation – source-code obfuscation
StringCare
StringCare is an Android Library and Android Studio Gradle Plugin for obfuscating strings (strings inside the code) at compilation time. StringCare manages strings and assets files in your Android application. Developers can specify what strings and assets should be obfuscated in the XML files.
Code Snippet and Reference Implementation
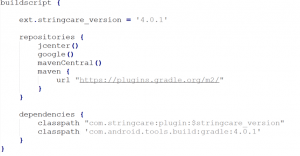
Plugin setup:
StringCare plugin looks for string resources for obfuscating at compilation time. Include the following in your project-level build.gradle file to make it work globally in the project.
Library setup:
The library is used for revealing the obfuscated string resources generated by the plugin. The obfuscated strings are revealed at runtime. Include the following in-app module’s build.gradle file.
Source Code
Documentation: AndriodLibrary
Reference for Implementation:StringCare
Overall, integrating ProGuard into your Android app development workflow is an effective strategy to protect your code from reverse engineering and ensure the confidentiality of your intellectual property.